- Commissioning
- Connect devices
- Stiebel Eltron
Stiebel Eltron
This page describes the connection of a Stiebel Eltron heat pump to the SOLARWATT Manager.
Installation and configuration
Interface: Ethernet
Applicable documents
Requirements
Stiebel
- Stiebel Eltron heat pump is installed in accordance with the Installation instructions
- Internet Service Gateway (ISG) is connected to the heat pump
- The ISG is integrated into the local network
- Internet access via local network available
- The current date and time are set on the heat pump controller
SOLARWATT Manager
- Manager and ISG are in the same local network
- A compatible setup is set up on the Manager
Compatibility
ATTENTION : Only heat pumps that have a tick in the EM Trend column in the ISG compatibility overview document are also compatible with thermal energy management via Solarwatt.
- Thermal energy management only works with the program or hot water operating modes that can be set on the heat pump or in the Stiebel Eltron Service World
- Heat pump cascades are not compatible with thermal energy management
- The MyStiebel app cannot be used at the same time when thermal energy management is activated
- Thermal energy management currently only works with the following energy meters as the main meter
- SMA Energy Meter
- Shelly 3EM/Shelly Pro 3EM
- ACS Flex
- Sungrow meter
- Solarwatt meter DTSU 666
- Further Notes on thermal energy management
Configuration steps
The installation of the Stiebel Eltron heat pump on the SOLARWATT Manager comprises the following main steps:
- Activation of the portal in the Stiebel Eltron Service World
- Activation of the thermal energy management
- Installation of the ISG in the SmartSetup of the SOLARWATT Manager
- Setting up the external connector in the Stiebel Eltron Service World
- Configuration of thermal energy management in the service world
Step 1: Activate the portal in the Stiebel Eltron Service World
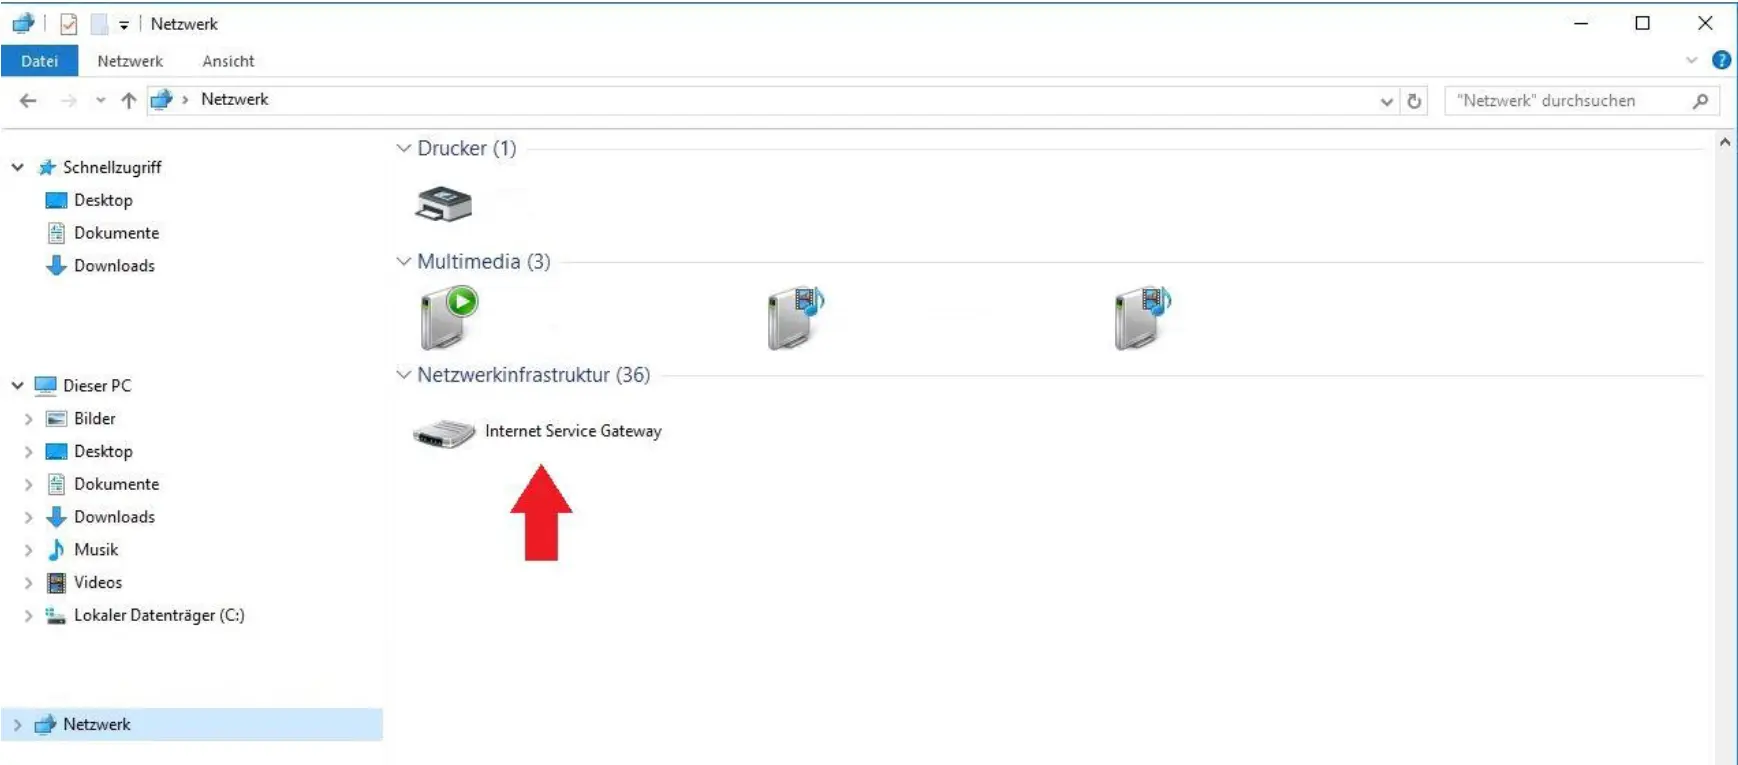
- Call up the service world by double-clicking on Internet Service Gateway in your Explorer
or
- Start the service world by entering the URL http://servicewelt in the address bar of your browser.
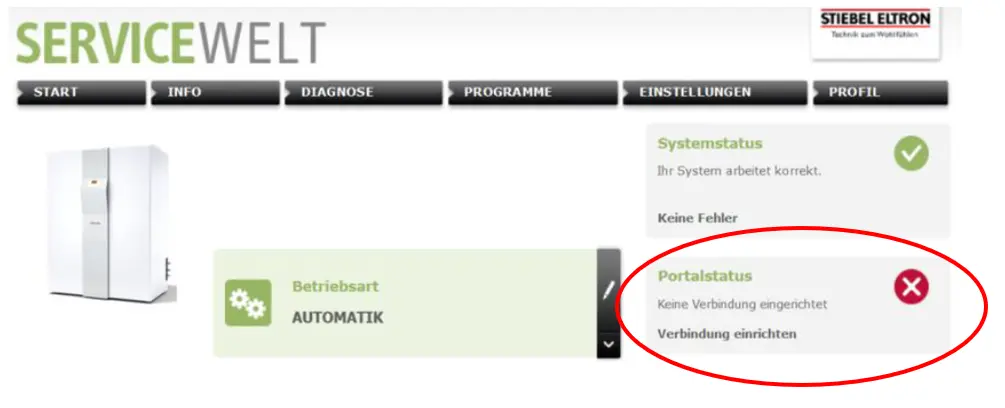
- In the Portal status area, click on Set up connector.
- Read and accept the privacy policy by clicking Next.
- Complete the registration form, enter an e-mail address (your portal key will be sent to this e-mail address) and confirm by clicking Next.
- Confirm that your details are correct by clicking OK. You will receive a confirmation by e-mail.
- You will receive the portal key by e-mail within a few minutes to an hour.
- Copy the activation code (portal key) from this e-mail.
- Click on Set up connector in the Portal status area.
- Enter the activation code (portal key) and confirm with OK.
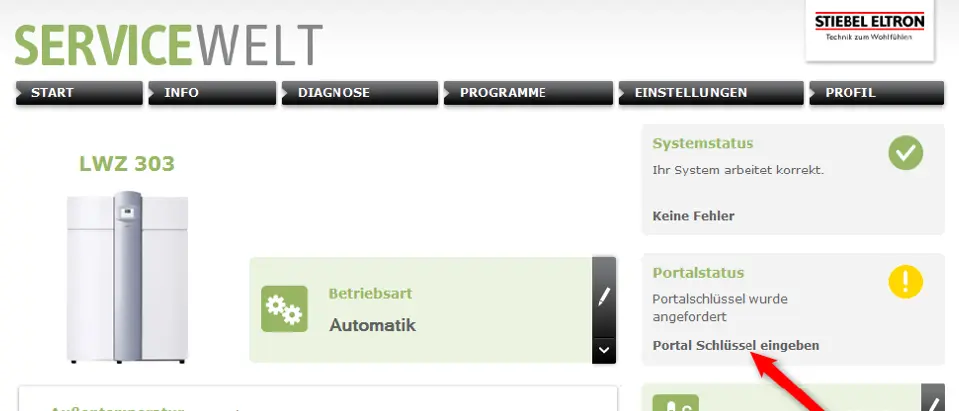
- After entering the portal key, it can take up to 30 minutes for the yellow exclamation mark to turn into a green tick and the red LED (X2) on the ISG to switch to green. Then the login was successful.
Step 2: Activation of thermal energy management
- Send an e-mail to heat@solarwatt.com with the following information:
- MAC address of the ISG
- Serial number of the SOLARWATT Manager (see back of device)
- The thermal energy management will be activated within the next 2 working days.
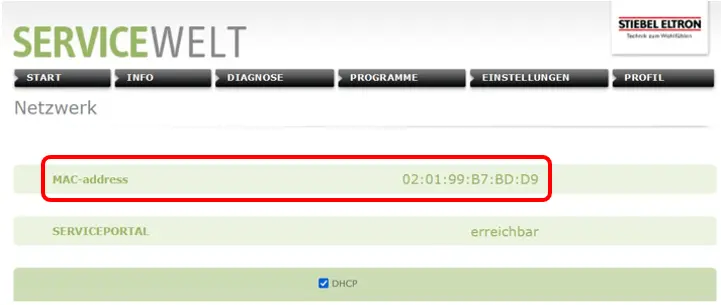
Determining the MAC address of the ISG
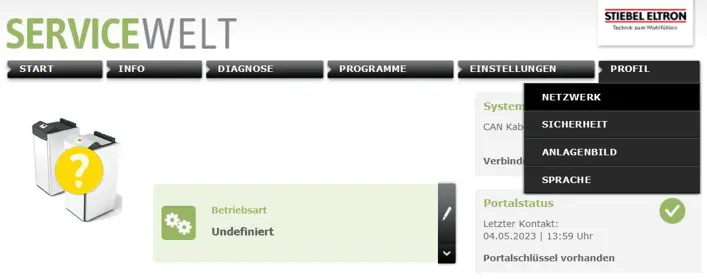
- Open the service world
- Open the Profile > Network menu. The MAC address is displayed behind the MAC address entry.
Step 3: Installing the ISG in the SmartSetup of the SOLARWATT Manager
Prerequisite: Configuration steps 1 and 2 completed.
Starting SmartSetup
Search for devices
- Select Stiebel Eltron ISG heat pump Binding in the drop-down menu.
- Select Automatically detect IP address and click Add device to search.
- Confirm the Search and install devices button.
You can recognize correctly installed devices by the message: Device is installed. in the device list.
Step 4: Setting up the external connection in the Stiebel Eltron Service World
Prerequisite: Configuration steps 1 and 2 completed.
Once thermal energy management has been successfully activated, the communication interface must be set on the ISG.
- Start the Service World by entering the URL http://servicewelt in the address bar of your browser
- Select Profile > External connectors
- Click on Search in the new window
The SOLARWATT Manager automatically appears in the white selection field.
- Then click on Connect

Step 5: Configuration of thermal energy management in the service world
Prerequisite: Configuration steps 1 and 2 have been completed.
Use the following settings to adapt your system to your individual building and usage situation.
- Call up the service world by double-clicking on Internet Service Gateway in your Explorer
or
- Start the service world by entering the URL http://servicewelt in the address bar of your browser
- Call up the menu item Energy management under Settings
- Make the settings there according to your system configuration.
You can find corresponding Notes in the document "Installation instructions Stiebel Eltron EM Trend" (Chapter 6).
PV optimization settings
Additional settings are required to operate the device with a maximum proportion of solar power (PV optimization).
The settings for PV optimization are made in the SOLARWATT Manager portal under Optimization.
Selected articles: