- SOLARWATT Manager
- Commissioning
- SmartSetup
SmartSetup
The SOLARWATT Manager offers a web-based user interface in which you can install devices and configure them according to the house installation. This process is referred to as SmartSetup
Table of contents
Starting SmartSetup
Prerequisite: The Manager and the devices to be connected are accessible and correctly configured in the local network. There is an Internet connection.
Option 1: Local access
You access the Smart Setup via the browser of a computer, tablet or smartphone. The browser may need to be started in private mode . The device must be in the same network as the Manager.
- under Windows: http://energymanager/
- under macOS and Linux: http://energymanager.local
If access is not possible by entering the URL, please try the following alternatives:
- Open a private window in the browser (incognito mode)
- Use a different browser
- Enter the IP address of the EnergyManager (you can find this with network scan programs such as Network Scanner (Windows) or Fing (Android).
ATTENTION! A network scan requires the prior consent of your customer!
the local user interface of the Manager appears.
- Click the Smart Setup button.
- Enter the device password in the input mask.
You will find the device password on the back or top of the Manager and on the enclosed nameplate.
Option 2: Remote access via the Installer Center (IC)
Access is made from the Installer Center via the remote maintenance function.
Prerequisites:
- The Manager must be online.
- You have Installer Center access.
- The Manager is already bound to the customer.
- The Manager is linked to your InstallerCenter user account.
- The customer has granted you remote access rights
- Open the Installer Center (IC).
- Open the list of bound Managers (by clicking on Energy Manager). The Managers linked to your account are listed with their serial numbers.
- Click on Remote maintenance in the last column for the corresponding Manager.
- Enter your access data for the Installer Center.
- After clicking on Log in , remote access to the selected Manager is established.
- Click the Smart Setup button.
- Enter the device password in the input mask.
You will find the device password on the back or top of the Manager as well as on the enclosed nameplate.
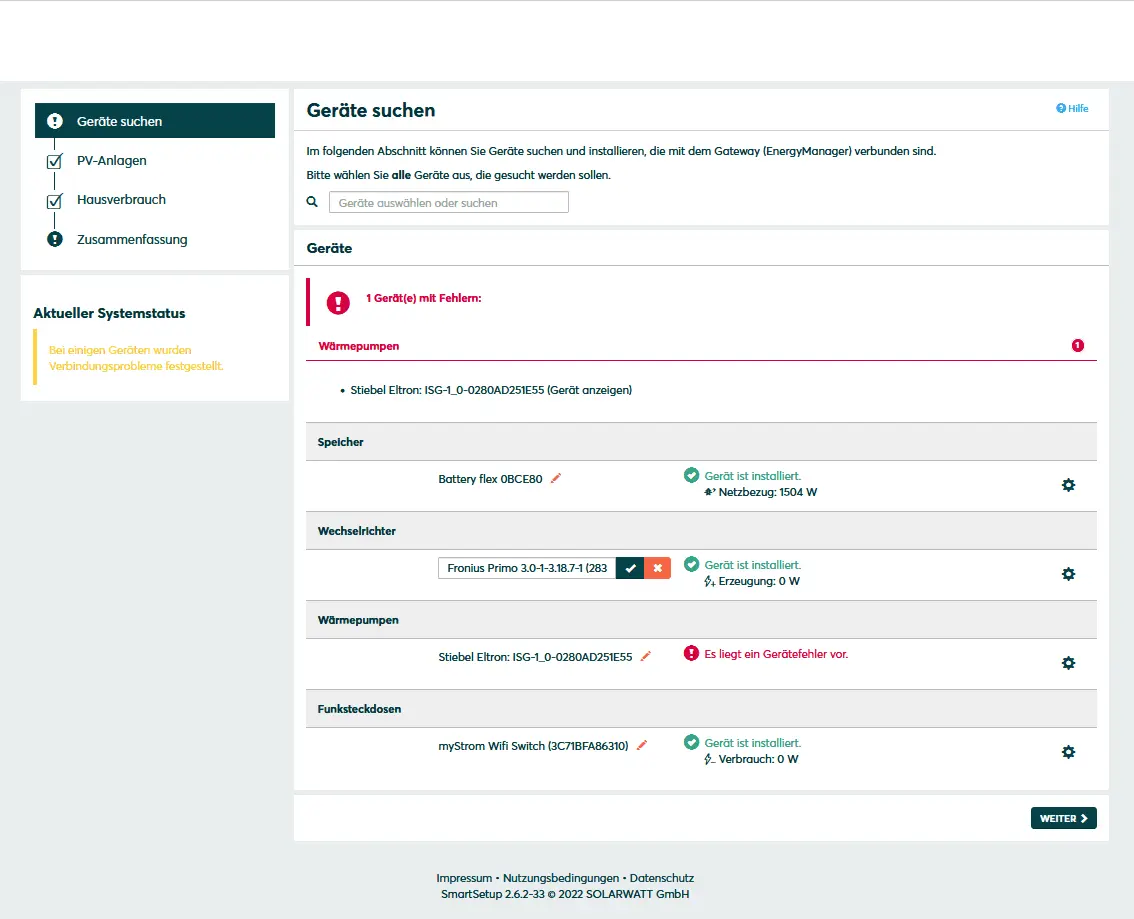
Search devices
In this setup step, devices are installed on the SOLARWATT Manager.
Certain device types are found and installed automatically (Automatic installation)
Other device types must be installed by selecting the device driver and specifying the IP address or host name (manual installation).
Information on the installation types can be found on the respective device pages (Connecting devices).
Automatic installation
If the device is correctly configured and available in the network, it is displayed in green in the device list.
- If necessary, connect additional devices
- Continue with SmartSetup PV systems
Manual installation
- Select Select devices in the drop-down menu or search for the corresponding entry according to the table below.
- Enter the required specifications according to the table below:
- Search mode
- iP address or host name, if applicable
- Click Add device to search.
- If necessary, add further devices to the search.
- Once you have added all the devices to be searched for, click Search for and install devices.
You can recognize correctly installed devices by the message: Device is installed. in the device list. The list also shows the current performance data.
Renaming devices
- Click on the pencil symbol behind the device name.
- Enter the desired name and confirm by clicking on the checkmark.
Assign unique device names, especially for installations that include several devices of the same type. This makes it easier to assign the devices in the following setup steps.
| Example of automatic naming | Example of individual naming |
|---|---|
| Fronius Primo 8.2-1 (2805100077044008) | Inverter south roof (2805100077044008) |
| Fronius Symo 3.5.3-1 (2736100074324015) | Inverter west roof (2736100074324015) |
| myStrom Wifi Switch (3C71BFA85C10) | myStrom Aquarium (3C71BFA85C10) |
| myStrom Wifi Switch (840D8E3DFA68) | myStrom Pool Pump (840D8E3DFA68) |
Changes to the device IP
For devices that are not included in the automatic device search, changing the IP address (e.g. by restarting the router) will result in the connection to the Manager being lost. An error message appears in the device list.
The new IP address must be stored in the setup.
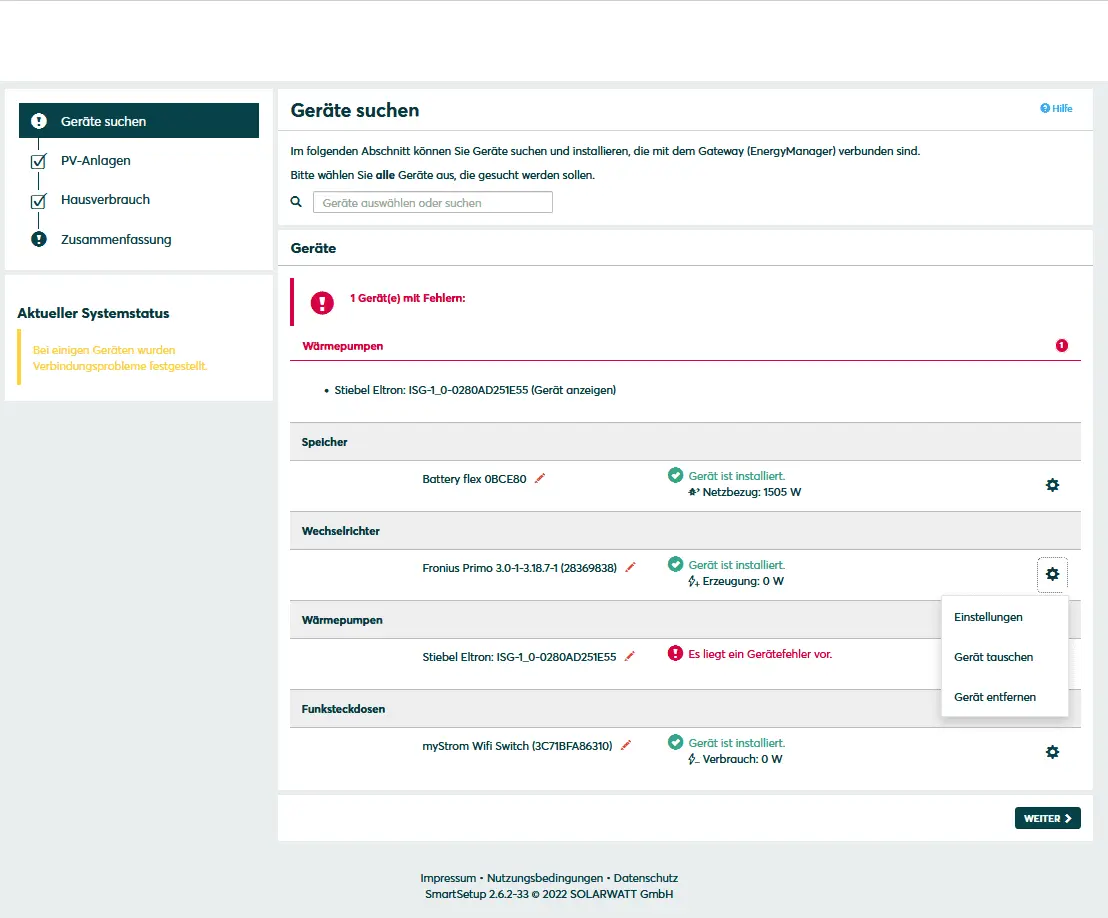
- Click on the gear wheel in the device list and then on Settings
- Enter the new device IP and click on Save.
- The connector to the device is then re-established.
Deleting devices
- Click on the cogwheel behind the device to be deleted
- Select Remove device
- Battery storage (MyReserve or Battery flex) and the AC-Sensor can be deleted together if required.
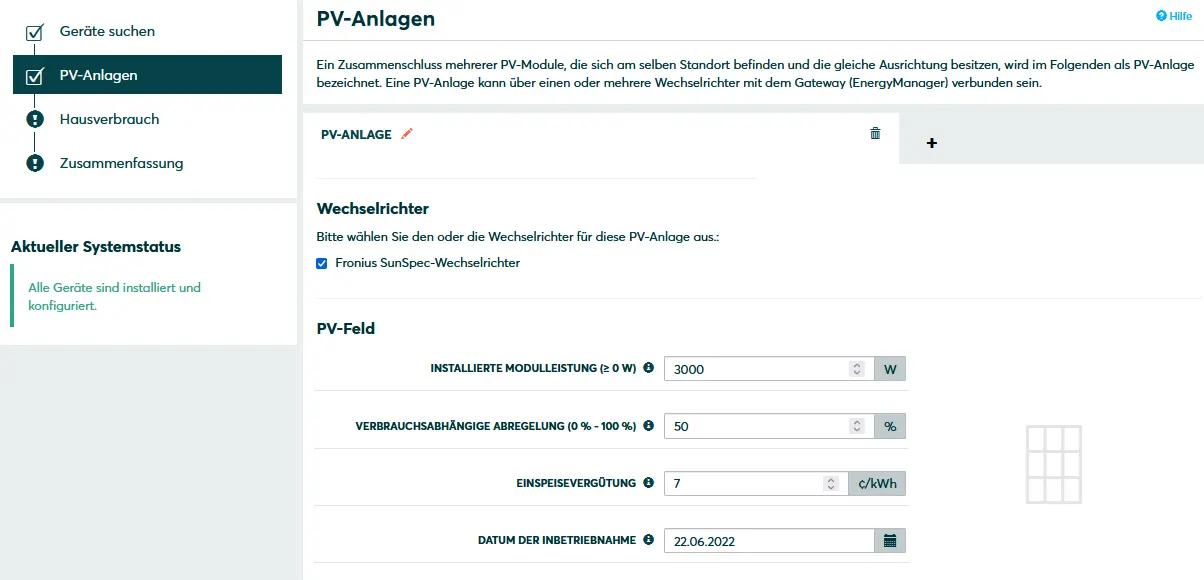
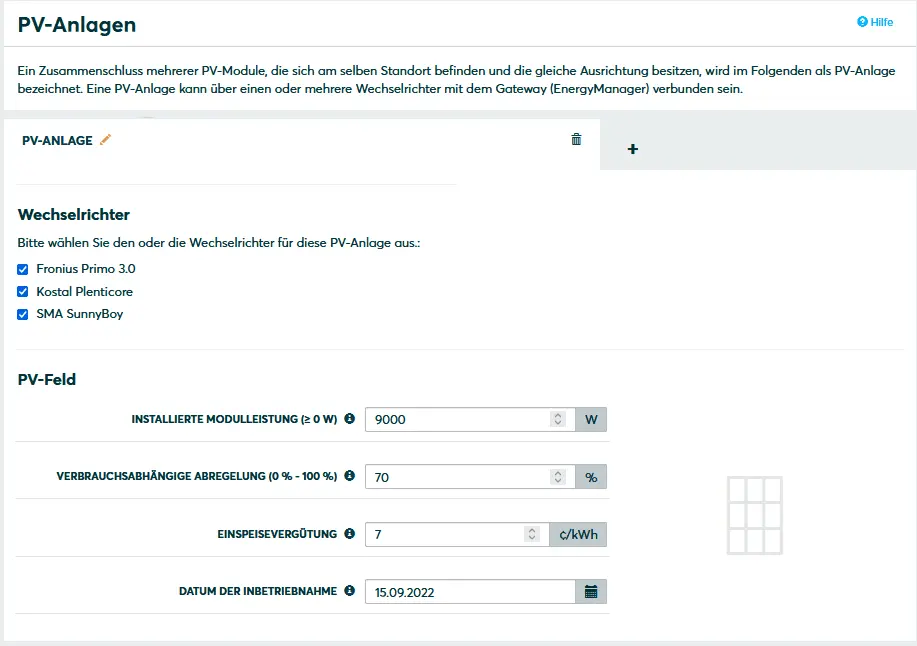
PV systems
In this setup step, all photovoltaic (PV) systems in the system are recorded and assigned to the corresponding inverters.
PV electricity generation is displayed and balanced on the basis of virtual PV systems that you create in SmartSetup and to which you assign inverters and storage systems.
One real PV system, one virtual PV system
If your installation only contains one inverter, balancing takes place within a virtual PV system that you link to your inverter and, if applicable, storage system.
- Click on the plus symbol to add a new virtual PV system and enter the installed module output, the consumption-dependent curtailment, the feed-in tariff and the commissioning date.
- Select the inverter from the drop-down menu.
- If the inverter is read via an S0 meter, select the option Select energy meter as inverter replacement
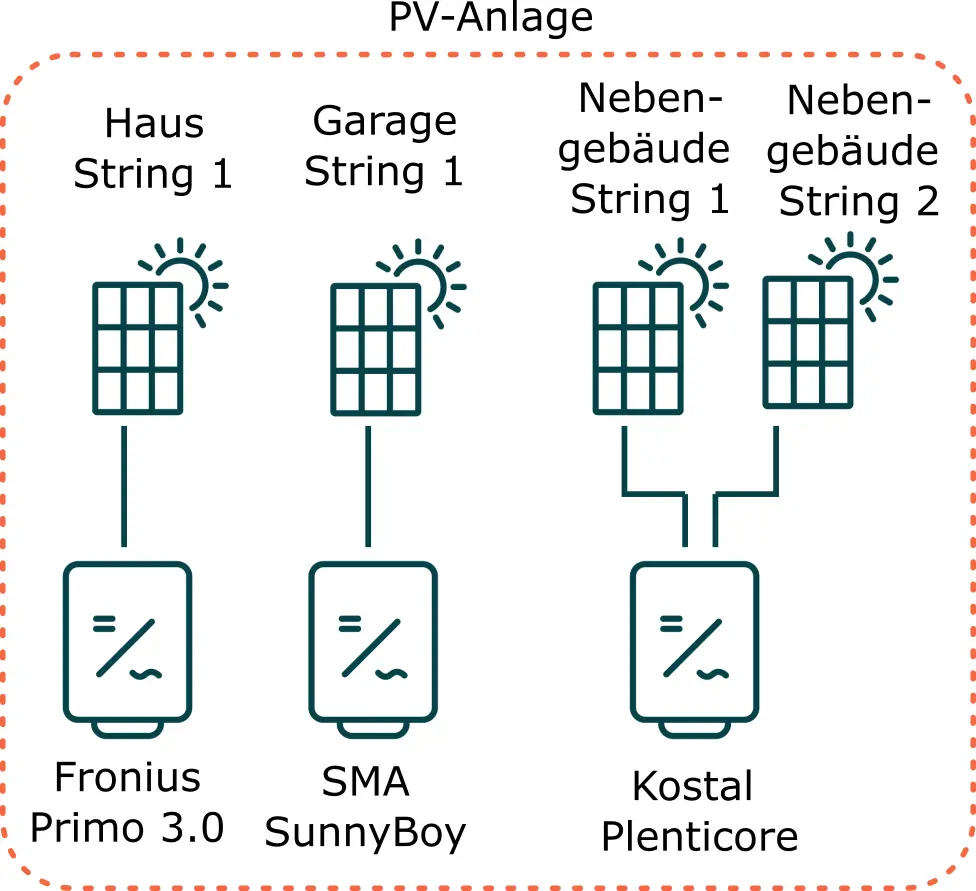
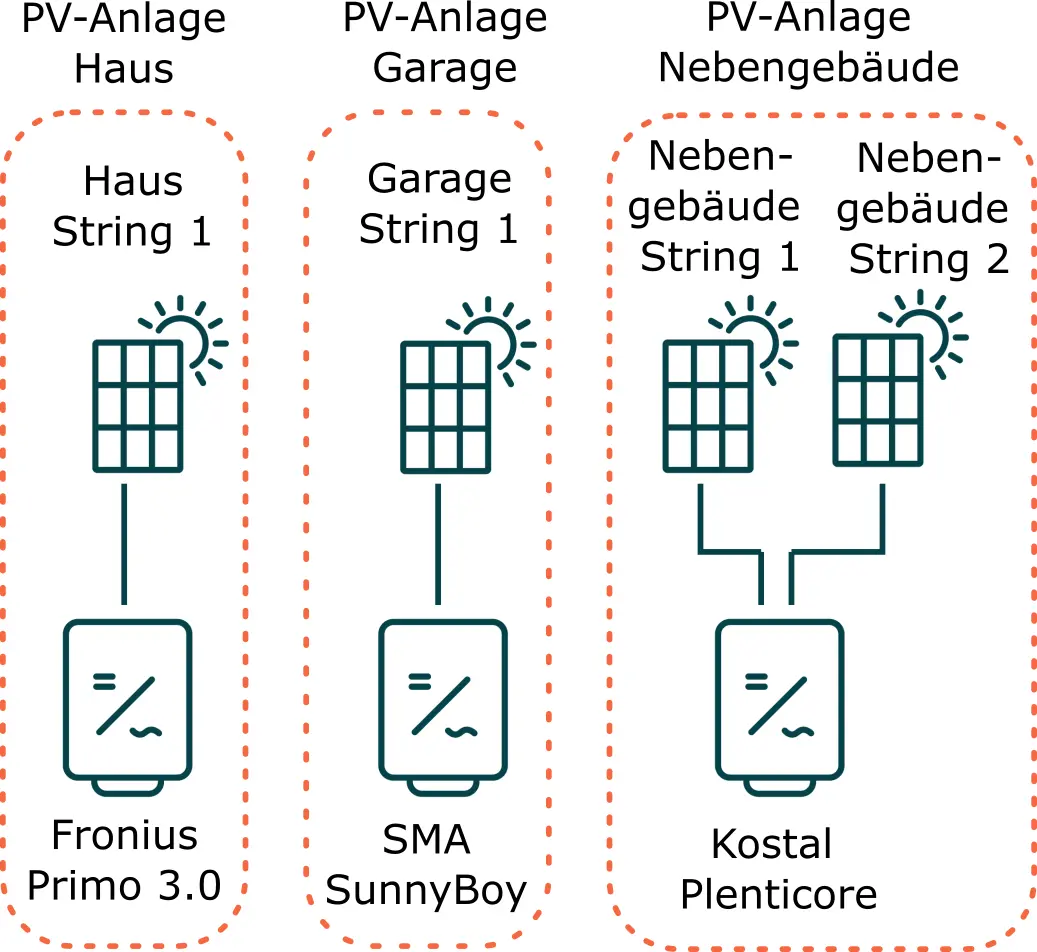
Several real PV systems, one virtual PV system
All inverters are assigned to a virtual PV system. The power data of all inverters is added together and taken into account in energy management.
Example:
- Three real PV systems; house, garage and outbuilding
- House: 1 string, Fronius Primo 3.0 inverter
- Garage: 1 string, SMA SunnyBoy inverter
- Outbuilding: 2 strings, Kostal Plenticore inverter
- in the Smart Setup, they are all combined into a virtual PV system
The generation data of the individual inverters cannot be read out separately in the portal. They are displayed together in a virtual PV system .
Configuration in SmartSetup
- Select all inverters
- for PV systems with integrated MyReserve, the option PV system with storage appears; assign the corresponding inverter to MyReserve
- Enter the installed module power (total system), the curtailment limit and the feed-in tariff.
- Once your multi-PV system has been successfully configured, the data for the PV system should be listed in the summary.
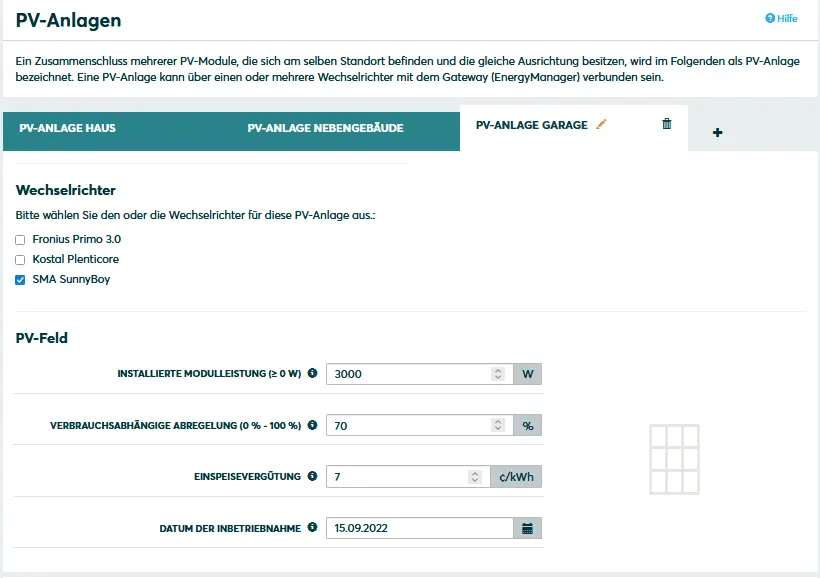
Multiple real PV systems, multiple virtual PV systems
A virtual PV system is created in SmartSetupfor each inverter . The power of each system is displayed separately in the portal.
Example:
- Three real PV systems; house, garage and outbuilding
- House: 1 string, Fronius Primo 3.0 inverter
- Garage: 1 string, SMA SunnyBoy inverter
- Outbuilding: 2 strings, Kostal Plenticore inverter
- three virtual PV systems in Smart Setup
Configuration in SmartSetup
- Select the appropriate inverter for the PV system
- Enter the installed module power (total system), the curtailment limit and the feed-in tariff.
- Use the plus symbol to add another PV system
- Enter all the required data for the (virtual) PV system in the same way.
- for PV systems with integrated MyReserve, the option PV system with storage appears; assign the corresponding inverter to MyReserve
- Once your multi-PV system has been successfully configured, the data for both PV systems should be listed in the summary.
House consumption
In this setup step, you assign the integrated devices according to the topology of the domestic installation. This assignment is crucial for functioning energy management and the correct balancing of energy flows.
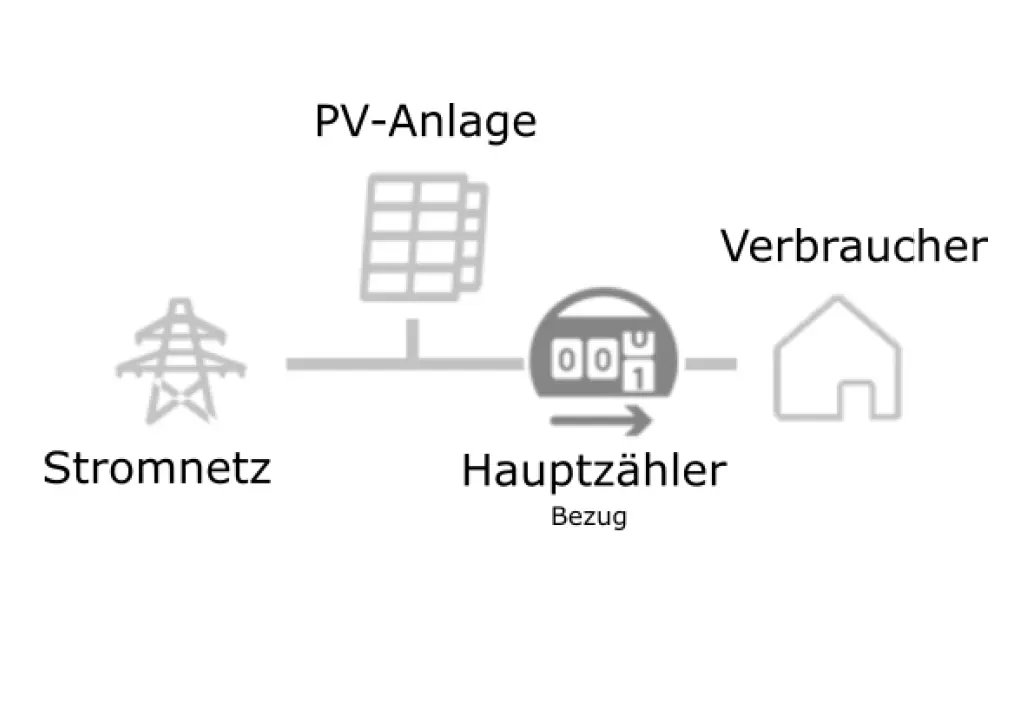
Main meter
In terms of energy management, the main meter is the meter that measures the total electricity consumption of the household and, if applicable, the feed-in to the public grid.
The position of the main meter indicates the installation location in relation to the feed-in point of the PV system and the consumers in the household.
Between the grid and the PV system
The installation location of the main meter is between the feed-in point of the PV system and the consumers on one side and the utility grid on the other.

Main meters installed at this point must work in both directions, i.e. record both consumption and generation.
Variants supported by the SOLARWATT Manager can be found here.
Select the variant that corresponds to the house installation from the drop-down menu.
Between the grid and consumers (consumption meter)
The installation location of the main meter is between the PV system and the household loads.
At this point, the main meter must only record the electricity consumption. When installing S0 meters, ensure that they are installed in the correct direction. The feed-in resulting from PV power generation is calculated by the Manager.
Assigning the devices
In this setup step, the installed devices are assigned according to their installation location in relation to the main meter. Correct assignment is a prerequisite for correct balancing and functioning energy management.
After installation, all devices are assigned to the category
Unbalanced devices by default. To change the assignment, click on Change device assignment and assign the device to one of the following categories.
Devices registered by the main meter ("on the house side")
Criterion: The installation location of the device is "on the house side" of the main meter.
The consumption or generation of all appliances installed on the house side is recorded in total by the main meter.
Appliances not recorded by the main meter ("grid-side")
Criterion: The installation location of the appliance is between the electricity grid and the main meter. The appliances are recorded by the utility meter.
The consumption or generation of these devices is not recorded by the main meter. The devices are read by the Manager flex. As a result, they are included in the energy balance of the household consumption.
Devices not included in the balance
Criterion: The appliances are not recorded by the utility meter.
The consumption or generation of these devices is not recorded by the main meter and is not included in the energy balance. Typical for this configuration are full-feed PV systems or appliances with their own tariff, such as heat pumps.
Summary
In this setup step, you can check the assignment of all devices using a graphical representation, test and log the derating of the inverters by the Manager.
House consumption - Interconnection view
Only available on SOLARWATT Manager flex.
The interconnection view shows the relationship of all devices installed on the Manager.
You can check whether the assignment of the devices is plausible and corresponds to the topology of the house installation.
The following points will help you with the check:
- If your installation only includes balanced devices, all blocks in the interconnection view must be connected by lines.
- Deviceson the house side must have a direct connection to the household block.
- Grid-side devices must have a direct connection to the power grid block.
- There must be a main meter (AC-Sensor or S0 meter) between the grid and household blocks.
Example configuration
- House-side: 1 PV system with Battery flex and Fronius Primo 3.0 inverter
- On the house side: MyStromPlug (switchable socket)
- Main meter: Battery flex AC-Sensor (ACS)

Regulation test
At this point, you can check whether the derating of the inverter by the Manager flex is working. The result is displayed immediately after the test is completed and logged in the summary. To start the curtailment test, click on Test curtailment:
Prerequisite for a successful curtailment test:
- The inverter settings must be selected so that external power specifications are accepted
- The current PV input power must be at least 20% of the maximum PV input power of the inverter
Print summary
Here you can generate a document with the summary of your configuration including the result of the control test.
Continue with the customer invitation
In order for the end user to be able to use energy management, a customer invitation from the commissioning installer is required.
The customer invitation is made in the Installer Center under the heading Customer invitations.
- Click on Invite customers to the portal.
You will need the following for the customer invitation:
- Serial number of the SOLARWATT Manager
- Device password of the SOLARWATT Manager (you will find this on the back or top of the device, as well as on the enclosed nameplate)
- E-mail address of the customer or user
Selected articles: