- Home
- SOLARWATT Charger vision
- Planning
Planning
This chapter helps you to select the right charger and gives you tips on preparing for installation.
Table of contents
Tips
Variants / equipment
Maximum charging power:
Most all-electric electric vehicles can charge with 11 kW (AC, three-phase), a few all-electric electric vehicles can charge with 22 kW (AC, three-phase). Plug-in hybrid vehicles, on the other hand, only charge at 3.7 - 7.4 kW (AC, single-phase). The charger is delivered from the factory with the maximum charging current (charging power). The maximum charging current (charging power) can be freely configured / limited via the SOLARWATT Pro app.
Available variants Charger vision:
- 11 kW / 16 A / three-phase AC connection
- 7.4 kW / 32 A / single-phase AC connection (only available as socket / shutter)
Charging point (cable / socket):
In Europe, the type 2 plug is standard. All electric vehicles delivered in Europe can be charged with the Charger vision.
For privately used charging points, a permanently attached charging cable is recommended for reasons of convenience so that the user does not have to plug in / unplug the mobile charging cable during the charging process. When selecting the location of the charger, consider the parking situation of the electric car (where is the charging connection on the car?). A charger with a socket is recommended for commercially used charging points, as a permanently attached charging cable would quickly wear out during the many charging processes. The socket is equipped with a shutter (contact protection) to prevent electric shock.
Available variants Charger vision:
- 6 m fixed charging cable (type 2)
- Socket (type 2) with shutter (contact protection)
Authorization (RFID):
If the charger is installed in a public area, it is advisable to release the charging process via prior authorization in order to prevent unauthorized charging by third parties. Authorization is carried out by presenting an RFID card to the charger. Only trained (authorized) RFID cards can start the charging process. Two RFID cards are included with the charger, which are authorized to start the charging process. Additional RFID cards can be learned / authorized via the SOLARWATT Pro app. All RFID cards that comply with the ISO/IEC 14443 A standard are supported. Additional RFID cards can be ordered from Solarwatt. RFID authorization is activated at the factory. If the Charger is installed in a private area, RFID authorization can be deactivated via the SOLARWATT Pro app. The charging session is then started immediately after the electric car is plugged into the charger.
- RFID is available on all Charger vision
Possible applications
Energy management / phase switching:
The Charger vision can be integrated into the Solarwatt energy management system. The Charger can be PV-optimized, cost-optimized or time-controlled via the energy management system. The 11 kW (three-phase) version of the Charger vision has integrated phase switching, which enables a variable power setting of 1.4 - 11 kW.
Company car billing:
The integrated energy meter of the SOLARWATT Charger vision is not MID-compliant. Therefore, the Charger vision is not suitable for billing a company car (or only with the consent of the employer). For company car billing, we recommend the SOALRWATT Charger max, which complies with measurement and calibration law.
Controllable consumers (§ 14a ENWG):
Charging points for electric cars belong to the controllable consumption devices according to § 14a EnWG (obligation to establish controllability). The grid operator must be given the option of throttling the charging power of the charger remotely to 4.2 kW for a limited period of time in the event of grid-critical conditions. This can be done either directly at the charger via an external control box or indirectly via the energy management system. As a rule, the grid operator throttles the charger via the energy management system. If no energy management system is available and / or the grid operator insists on the possibility of throttling the charging power directly at the charger, the control box included in the scope of delivery must be installed.
Load management:
If the available grid connection power is not sufficient to cover the house load and the maximum power of the Charger, the maximum charging power of the Charger can be regulated via dynamic load management so that a defined maximum current (maximum power) is not exceeded at the grid connection point. For load management, a compatible electricity meter must be installed at the grid connection point and connected directly to the Charger via an RS485 communication line.
Remote diagnostics / remote support:
The Charger vision can send data to the cloud. Solarwatt has access to this data and can evaluate it for error analysis. The Charger can be configured remotely by Solarwatt via the cloud connection and firmware updates can be updated. Many problems can thus be resolved remotely. The cloud connection must be activated via the configuration interface of the SOLARWATT Pro app when the Charger is commissioned.
Energy management
The Charger vision is compatible with the following SOLARWATT Managers:
- Manager flex 1.0
- Manager flex 1.5
- Manager rail
Up to two Charger vision units can be connected to a SOLARWATT Manager in parallel.
To connect the Charger to the energy management system, the Charger must be integrated into the end customer's local network. For stable energy management, we recommend a wired network connection (LAN).
Installation location
Consider the following points when selecting the installation location for the charger:
- Parking situation of the electric car (cable length sufficient?)
- Wall mounting or stand?
- Cable length and cable cross-section of the AC supply line
- Network connection, distance to the router / switch (LAN recommended)
- Sufficient space for cable suspension
- no fire loads in the immediate vicinity
- If possible, no direct sunlight, protected from rain
Check whether the condition of the wall and the enclosed mounting material are suitable for supporting the product weight of the Charger (5 kg) plus the tensile load (charging cable).
Optionally, the Charger can also be mounted on a stand (not included in the scope of delivery). The stand is available as an accessory from Solarwatt.
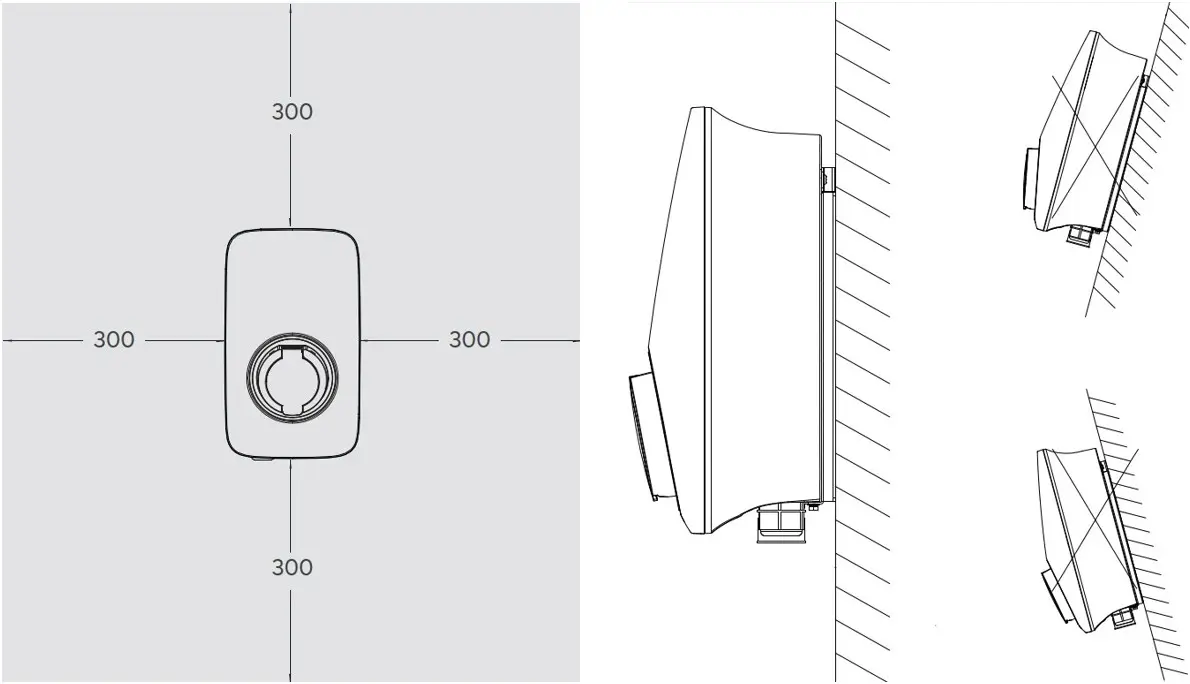
Vertical mounting / 300 mm side clearance
Required accessories and tools
Accessories required for installation:
- LAN cable
- AC cable
- suitable circuit breaker
- Residual current circuit breaker (RCD type A 30 mA)
- SOLARWATT Pro app
Tools required:
- Wrench
- Screwdriver
- Drill
- Pliers
- Crimping pliers
- Wire stripper
- Spirit level
- Folding rule
- Drill hole marker
- Multimeter
- Safety shoes
- Safety gloves
- Safety goggles
Structure / Dimensioning
Charger vision body (version with cable):
| A | Side cover AC installation |
| B | RFID reader |
| C | Type 2 charging cable with plug holder |
| D | Status LED |
| E | OFF button |
| F | RJ45 socket (LAN) |
| G | AC input |
| H | RS485 connection |
| I | Mounting bracket |
| J | Mounting base plate |
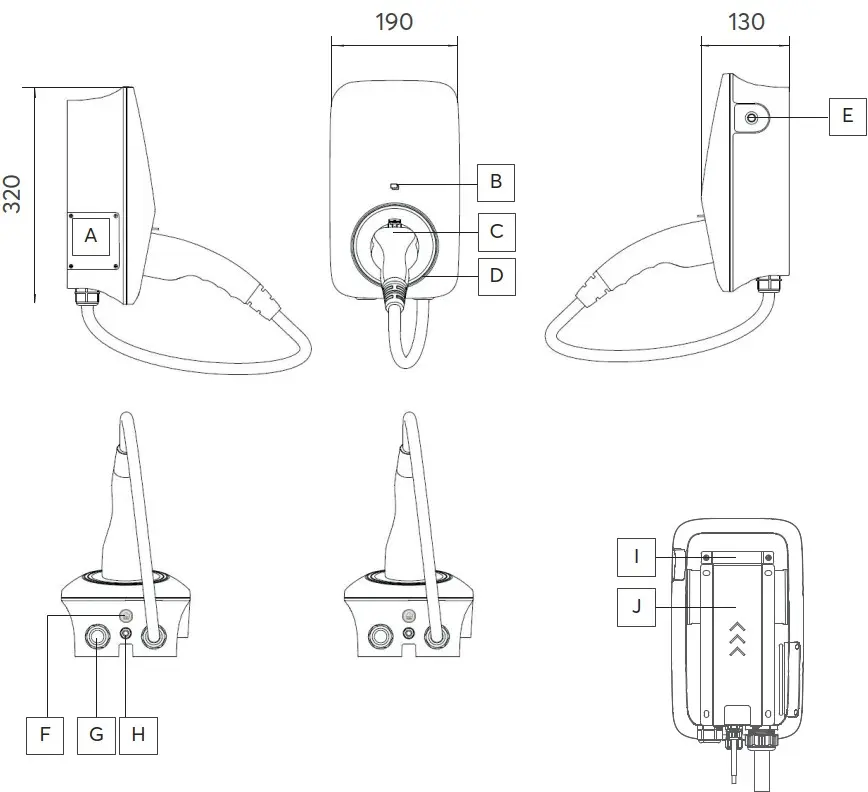
Structure / dimensions - version with cable
Charger vision body (version with socket):
| A | Side cover AC installation |
| B | RFID reader |
| C | Type 2 charging socket with shutter |
| D | Status LED |
| E | OFF button |
| F | RJ45 socket (LAN) |
| G | AC input |
| H | RS485 connection |
| I | Mounting bracket |
| J | Mounting base plate |
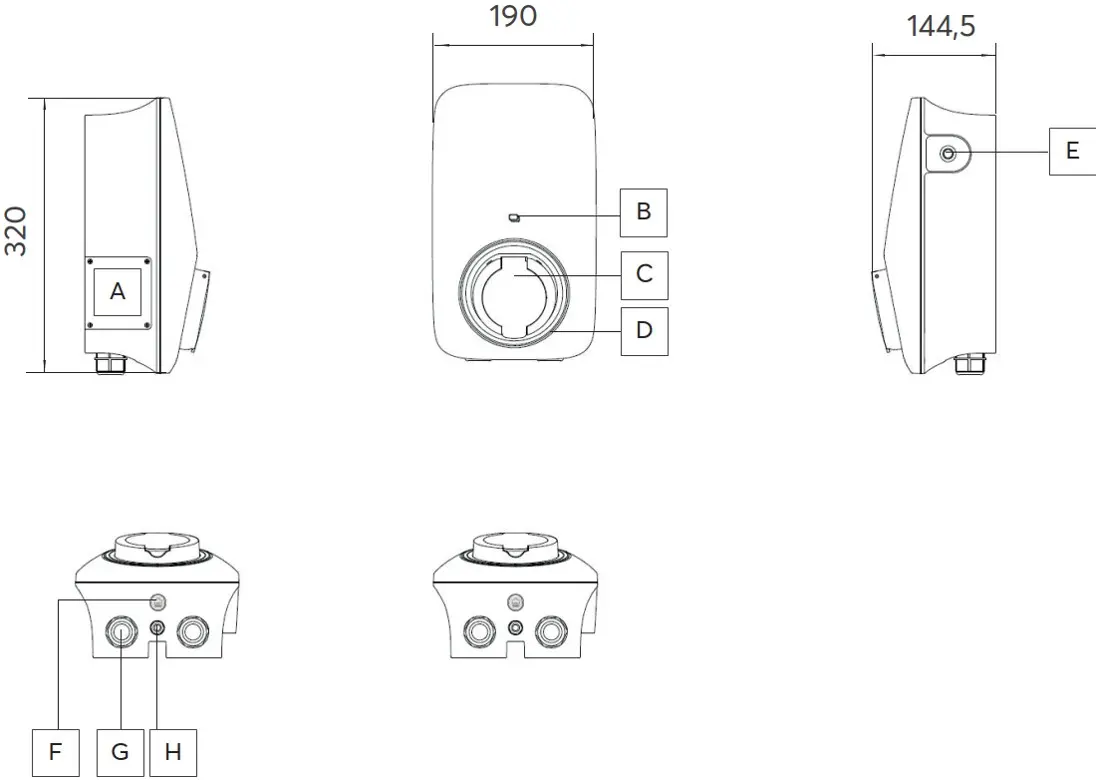
Structure / dimensions - variant with socket
Scope of delivery
| 1 | 1x | Charger vision | depending on variant with cable or socket / shutter |
| 2 | 1x | Control box | Only for cable version. § 14a EnWG controllable consumption devices Only required if the grid operator wants to reduce the charging power directly at the charger (e.g. ripple control receiver). |
| 3 | 2x | RFID cards | Are already programmed / authorized in the charger. |
| 4 | 1x | Drilling template | Cardboard, part of the packaging. |
| 5 | 1x | Mounting base plate | Fastening to the wall. |
| 6 | 1x | Mounting bracket | Attachment to the charger. |
| 7 | 6x | Dowels (8 x 40) | 4 pieces for fixing the mounting base plate to the wall, including 2 spare plugs. |
| 8 | 6x | Screws (8 x 40) | 4 pieces for fastening the mounting base plate to the wall, including 2 replacement screws. |
| 9 | 2x | self-tapping screws (4 x 10) | For attaching the mounting bracket to the Charger. |
| 10 | 2x | Mounting screws (4 x 10) | For securing the wallbox to the mounting base plate. |
| 11 | 5x | Wire end ferrules EVN10-12 | AC connection |
| 12 | 5x | Wire end ferrules EVN16012 | AC connection |
| 13 | 1x | RJ45 plug and union nut | For crimping onto a network cable. Union nut for fastening and sealing the LAN connection. |
| 14 | 1x | Documentation | Quick start guide, warranty activation |
| 4x | RS485 wire end ferrules | ||
| 2x | Spare screws (2 x 6) | Side cover AC connection |
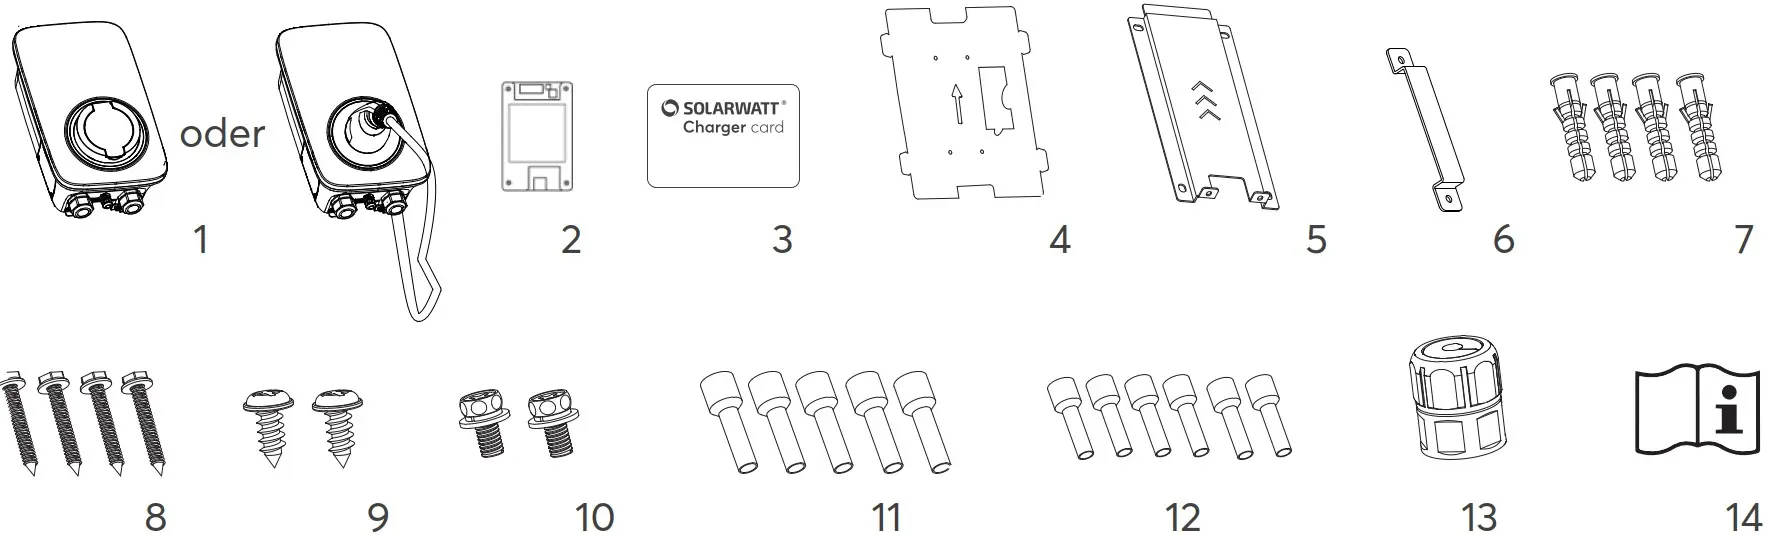
Charger vision scope of delivery
Type plate / serial number
The type plate is located on the left-hand side of the charger and contains
- Type designation
- Variant (rated power, cable or socket / shutter)
The serial number is located on the label below the type plate and can be read using the QR code printed next to it.
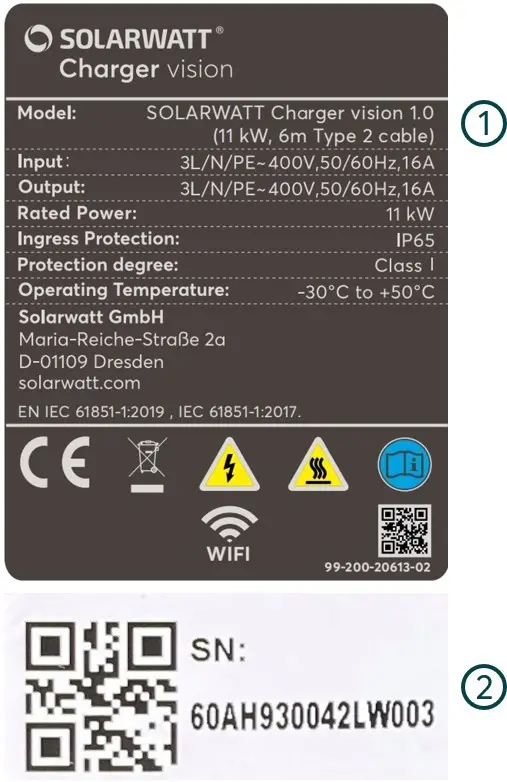
Type plate - (1) Model / (2) Serial number